Saturday, November 12, 2016

Damn spell went wrong .......

At Halloween she did use a shrinking spell just to shrink  herself a little so she would fit into her party dress. But the damn spell went wrong and now  she is  a drop dead gorgeous miniature of herself stuck in her store room trying to un-shrink herself.

She did  try swamp water, ocean juice, Elixer and moonbeams, spells  and many other things but so far no luck. If only she  could get to the spider juice on the top shelve......


The scene is once again set in a book for I do have very little room for minis.  This is a wooden book box that I found at the dollar store. Hope they will have them in stock again real soon.

I used decoupage to decorate the box. Old catalogue pages for the inside and old looking paper for the door and then I added some basic shelves.


For the potion bottles  I used little glass bottles that held nail art stuff. They are very cheap but they come with a plastic stopper instead of a cork so you will have to hide those. I painted some, and replaced some by beads .

For the potions  I will have to give a big thanks to all those people who have wonderful video's on Youtube about making  bottles of potions . They inspired me to use clear glue to fill the bottles with and add things  to that. Paint or food coloring for color and different types of objects etc.

 The witch punch has dried herbs from the kitchen, the skeleton flowers are dried seedpods from the garden ocean juice has food coloring, shells and moss added. Just to give you some idea.


The lovely bottle on the right is actually an earring. The bottle stopper is also the thingy that keeps the earring in place. I added a  plastic ring so it could stand on it's own.
I found  them at a store called Action ( the closest thing we have to a dollar store ) and they were very cheap and available with different colors of glittery stuff inside. 


The witch is a plastic doll I found in a box of plastic toys someone gave me to play with. Come to think of it she might well be Snow White's stepmother..........oh well then I guess this serves her right.


Wednesday, November 2, 2016

Yummy no bake chocolate cakes

Yummy no bake chocolate cakes.


Ingredients :
Foam beads
Acrylic paints in chocolate colors
Miniature gravel
Tacky glue

Also needed :
Piece of glass and a straight blade.

Optional decorations :
Nail art orange slices
Micro beads


The main ingredients for these cakes are foam beads and acrylic paints.  For those who are not familiar with foam beads : they are biggish beads made out of foam  for kids to play with. I buy mine at the dollar store. If you cannot find the beads try pieces of dowel or corks instead.


When you buy the beads it is a good idea to check for different sizes and shapes. The holes will be covered with the decorations .


For the chocolate I used acrylic paints. A dark brown will be fine. For white chocolate you can use a cream color and if you want milk chocolate you can use a mid brown color.


The first step is to paint your foam beads a chocolate color. The good news is that the foam is really easy to paint. 
Now we have our plain chocolate cake we can have fun decorating.


 The first  two cakes have a thin layer of chocolate wrapped around them  and they also have chocolate shavings and curls.  They may look complicated but they are really easy to make.

You will need : acrylic paints, a piece of glass or a small mirror and a straight blade. 


Apply a thickish  coat of paint to  your glass. Do not make it too neat, some wrinkles will just look awesome. Leave to dry and forget about the whole thing for a few hours.


Use the straight blade to gently scrape the chocolate layer off the glass.  No need to panic if you get some small bits too , they are the perfect chocolate shavings. If you make some  long  narrow  strips  you can use them to make chocolate curls later.


Take a large  piece of chocolate , wrap around your cake and glue in place. If you do not have one piece that is big enough do not worry, no one will notice when  you patch smaller bits together. If you prefer you can even do just small bits around the whole cake. 


I like it when the chocolate wrinkles and tears a little here and there , somehow it looks more realistic that way.


You can buy very fine gravel for dolls house gardens. I often use this stuff in my cake decorating. Cover the top of the cake in glue and spread on the gravel.


The photo below shows  the same cake decorated with different materials:
Ribbon and micro beads, pink mini berries, chocolate curls and orange slices from a nail art cane.

I  made a variation on this cake and tied a ribbon round it. And I replaced the orange slices with micro beads.


The rose cake 


Ingredients:
Painted foam bead
Chocolate colored paint
Chocolate curls  
A ready made flower. I used a  cold porcelain rose that I bought.


This is the basic chocolate covered bead again but this time I did add an extra layer of chocolate icing. I used a palette knife to apply a nice layer of brown acrylic paint for that.


I had saved some long strips of the chocolate we made on the glas and I used some of those to make some nice chocolate curls for the top of this cake. Just fold and shape the long strips into nice curls and glue them on top of he cake 
The finishing touch is the rose or any other flower of your choice.


From left to right : Heartshaped cake, variation on cake one, rose cake.


The heart shaped cake.

This cake is made in the same way . I also added the chocolate curls but the rose got replaced by some gold micro beads I found with the nail art stuff at the dollar store.


The Chocolate mousse cake .


Ingredients :
Foam bead,  iced as before in the color of your choice.
Chocolate shavings like we made before.
Plastic sheet (mica)
Acrylic paint your choice of color
Hair elastics ( tiny rubber bands)
Tacky glue
Plastic flower


I wanted  chocolate to wrap around this cake that could be glued on really neat and tidy and would not break or crackle like the one we did before.
A sheet of thin plastic (myca) painted with chocolate colored paint  works really well.


When the paint has dried you can cut the plastic into strips that fit around your cake.  A nice extra is that you can use both sides of the strip.  The side that you painted will be look  more like chocolate icing while the other side will be like a smooth chocolate with a nice shine to it.


Apply tacky glue to can and wrap your chocolate round the cake.  One or two hair elastics will keep it in place till the glue has dried.


Decorate your cake with the chocolate shavings. I also added a small plastic flower that  I painted a nice chocolate color.


Cakes on my desk waiting for the photo. I did add some (talcum powder) icing sugar to some of them.


Tip :
If you have some paper punches you can punch shapes out of the chocolate covered plastic sheet for cute chocolate decorations for your cakes !


Thursday, October 27, 2016

Old clock into old world christmas part 2 .


Working on the top floor of the shop.


 My first plan was to create a room for the baker 's family but for the life of me I could not figure out how to make a room in the shallow space. I needed to work inside the frame of the old clock which gave me about an inch depth  or build something behind it which would mean it could no longer hang on the wall. In the end I decided I would use another box frame but have it behind the window  inside the clock frame and fill it with 3D decoupage .


This is where I had to fit the box frame for the upstairs part.


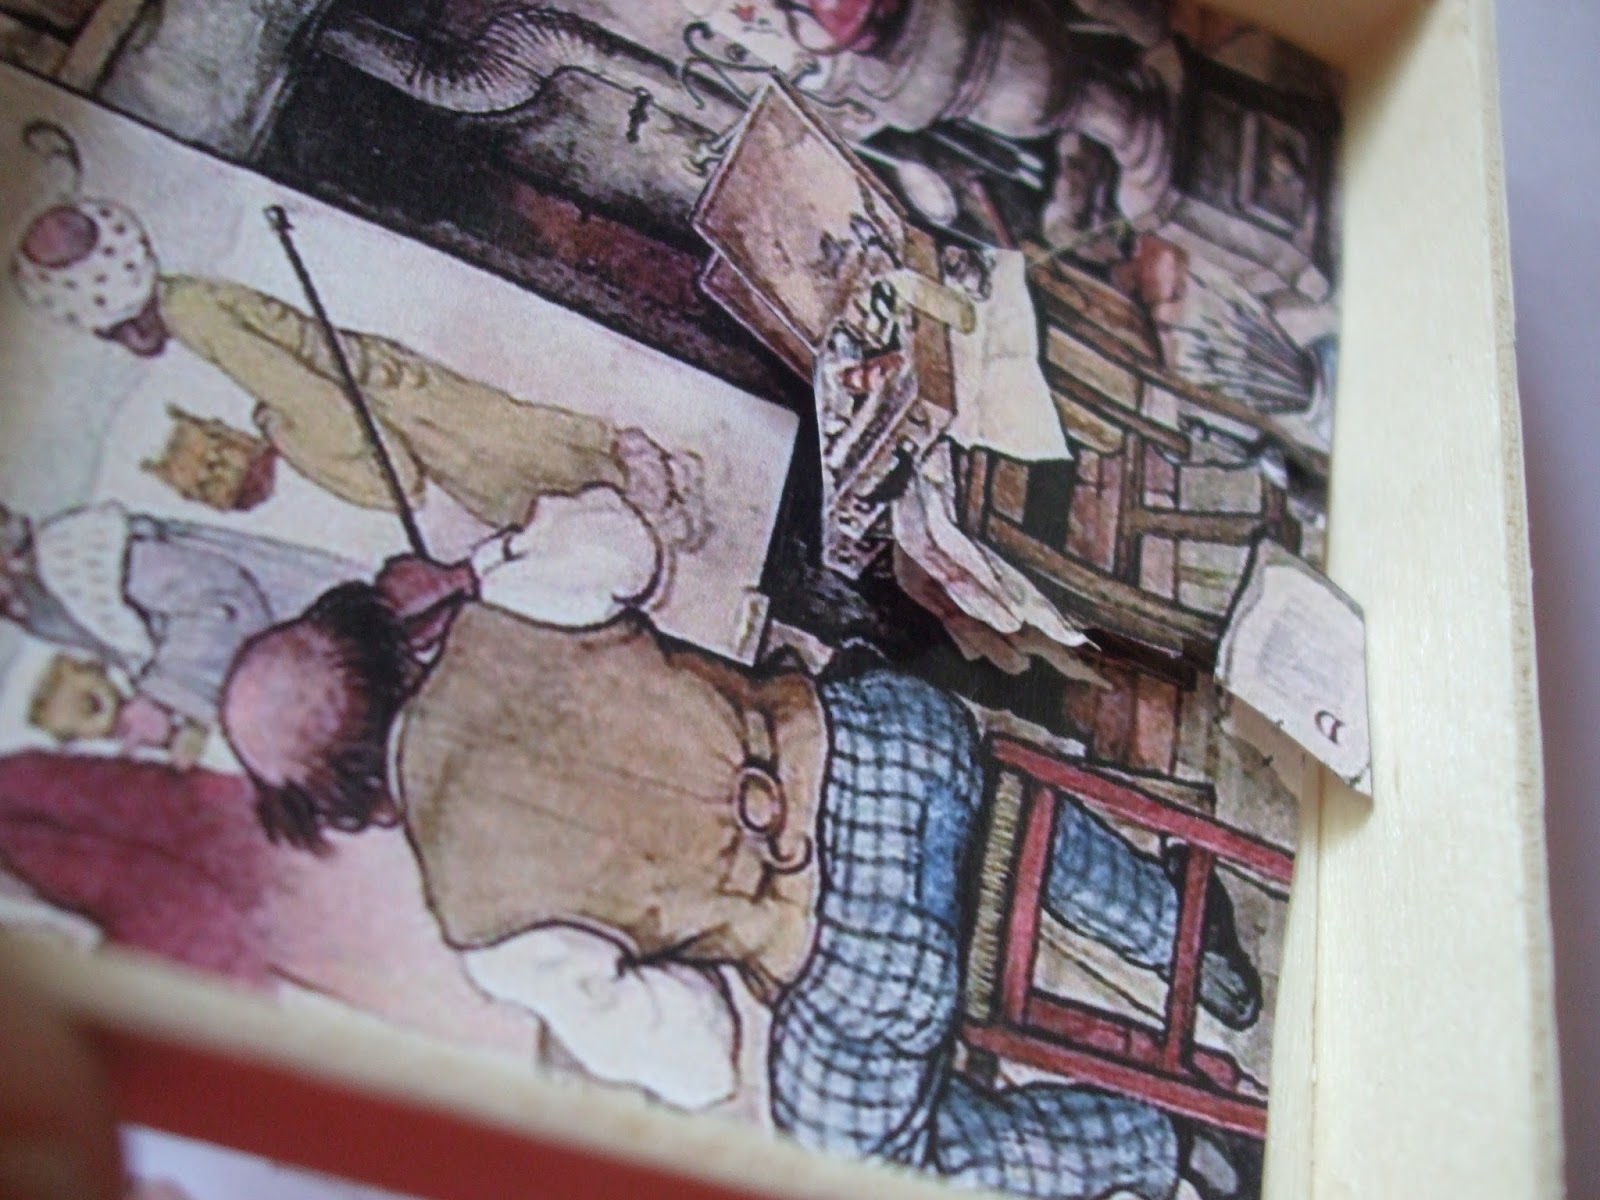
 I could not find a picture of a living room or a kitchen but I did find this great one where you look into an artists studio through a window. This one is also  done by Anton Pieck. Perhaps this is showing him at work. I loved how this picture matched into my scene.


 I printed several copies of the picture. I used one picture against the back of the box frame and then cut  out details like the stove and the lamp  and with double sided sticky foam I glued them to the basic picture. Which really made the room come alive. Tried it behind the window  and then  put it in a safe place to wait its turn.


Cut out parts ready to be applied with foam tape.


Extra layers being added to the picture.


Trying to show the layered effect.


  Working from the inside of the    building  I added the glass for the window  into the hole that was already there  and behind the glass I added some details cut out  of another print of the picture like the cat, vase etc. They are  supposedly sitting  on the window sill   and  this gave the room more depth . Then behind the glass I added the box frame

 Do not forget to paint the sides
  of the box frame  that are not covered   in a color that matches your room or it will look odd

.  I made a window frame that I glued on the outside of the building  to cover a multitude of sins  and I was pretty happy with the result.


The next thing I did was finishing all the paint work. I mostly used dark browns , dry brushed with black.

The  frost  on the windows was done with Mod Podge. I used  a  small brush and  the smallest amount of Mod Podge to add this effect. I added a little bit of fluffy plastic snow  to give the impression that it had just started to snow.

The shop sign was also done in 3D decoupage and I also  used some tiny buns made out of foamboard.

My finishing touch  will be  to add  a street sign saying Anton  Pieck Street as a thank you to  him for the inspiration. The street on the other side of the building will be Charles Dickens Road for I want  to thank him too  for his part in this Anglo-Dutch project .


Tuesday, October 25, 2016

Pull along toys

Here is my little friend Eric surrounded by the pull along toys I made for him.

I found all the animals at the thrift shop.  Birds ( Ornaments?) , wooden elephants and some others.

To turn them into toys you will need : 
Piece of thin wood for the animals to stand on.
Wire and press studs for the wheels
A small ring ( optional)
Piece of thread.
Tacky glue.

For the elephants you will also need :
Grey paint
Grey flocking
Small piece of paper.
Beads for eyes. 


Birds mounted on their wood bases.


What I used to make the wheels. You can use wire instead of the paperclips but I liked the size of them.   If you like you can paint the press studs.


Wheels and ring added to base.


Finished .


The elephants were looking nasty. They had been painted but most of the paint had been scraped off. So I decided to make them into furry critters .

The first thing to do is to give your elephant a nice thick coat of grey paint. Then cut two ears out of the paper and glue them to the elephant .

Paint the whole elephant again and  as soon as soon as you have finished the painting,  drop the elephant  into the grey flocking.  Have the container with the flocking ready and as soon as the elephant is inside give it a good shake. This will  make the flocking stick to your elephant


You may have to repeat the painting and flocking to give him a nice coat.
 When he is finished poke a bit of a  hole in the fur where the eyes are to go and glue the beads in place.

Mount to the wood base and add wheels as you did for the other toys.

Lady bug does not have the wood base. I just added the wire and wheels to the body because it was flat.


Friday, October 21, 2016

Pumpkin pie recipe

 Pumpkin pies.


Ingredients:
Buttons for the pie dishes.
Thin craft foam ( brown)
Narrow braid.
Glass paint ( orange)
Acrylic paint ( golden brown)
Aleene's Tacky Glue
Aleene's true snow ( optional )


Cut a craft foam circle that fits inside your button.  It does  not have to be a perfect shape for the braid will hide  the imperfections.


To get a nice pumpkin colour, paint the foam with a thin coat of orange glass paint.


Cut a piece of narrow braid long enough to fit around the foam shape. This will become the rim of your pie crust.


Glue the braid in place and paint a golden brown colour.


Decorate with some cream for a finishing touch.
Tip: for a nice shiny crust paint the top with Mod Podge.


Wednesday, October 19, 2016

Profiteroles. Mini cream puffs

Profiteroles
The mini version of the cream puffs we did before.


 Are usually served as a dessert with ( hot)  chocolate or caramel sauce.  They  are just  mini versions of the cream puffs.


  You will need the same ingredients but the size of the foam balls should be a lot smaller of course.  I found bags of different sizes of really tiny foam balls at a dollar store.


If you are making a ton of profiteroles colouring each one will be a bit of a hassle. I put mine in a small container and scrape a little bit off my oil pastel to go   into the container as well. I use a brush to move the foam balls around till they have a nice colour.


You can make them in the same way as the   cream puffs  but   the sticky tape will be really important to keep them from flying all over the place  when you cut and fill them.

 For the chocolate sauce you can use acrylic paint in a chocolate colour.

Tip : If you like your profiteroles filled with crème patisserie    ( custard) rather than with whipped cream you can simple turn your cream into custard by mixing in a tiny little bit of yellow acrylic paint with your snow paint or whatever you are using for your cream.