Thursday, December 4, 2014

The easiest way to make mini candles.


It is a very cold and dark day here in Holland so what better time than today for making some  easy mini candles.  Just follow the steps and have fun.


Erasers often have that nice waxy look that candles also have . So find some erarers in the color and shape you like. Remember you can cut shapes and sizes with a craft knife so you can have  any shape you like.


Now on to the wick.  You will need a pointed needle and a piece of cotton trhead. I used tatting thread. Thread through the eraser, leaving a tail at each end.


Cut thread , leaving a tail for the wick at the top. Tip: secure with tacky glue,


Finished candle glued to a mini suction cup . They make great candle holders.


 Decorate with some plastic berries


Add some clusters of tiny leaves. I use plastic ones but paper would work just as well.


 Add little bits of so called  stretchy vine ( www.,minkitz.com selll this brilliant stuff) for greenery.
   I used some coriander seess because they look like mini walnuts.


All done . I think it looks pretty festive. Hope you will be inspired to create your own version. Would love to see a photo if you make one.

Wednesday, November 26, 2014

Getting ready for the 5 th of december.


Here is Saint Nicolaas at work in his office. For hundreds of years he has celebrated his birthday december 5th by giving presents to all children big and small who have been good all year.

Presents are delivered into shoes that children put near the chimney at night. They  put carrots and hay in the shoes for Saint Nic's horse.


In his little office here you see him writing in his famous red book which holds all the names  and if they have been good or not and what presents they would like to get.

He is surrounded by gifts ready to be wrapped and traditional treats like chocolate letters, chocolate images of himself, different kinds of cookies and toys.

The paintings on  the wall show him and his helper Peter at work.


The scene is inside a little red book to match Saint Nic's book . The furniture is 48th scale . Saint Nic is a plastic doll but I just  had to use him because he has such a sweet face and really looks like  a Saint, does not he ?


I hope he will like it too and bring me some extra chocolates .


I


 I am adding some hints and tips on how to make this scene  and the items s in it.
The pictures on the  walls are pictures of Saint Nic at work.

I made this pictures a little more interesting by doing them in a 3 D technique.
For this  you will  need 3 prints of the picture  you are going to use.

If you use  pictures you download and print from the net, it is a good idea to paint them with Mod Podge or varnish so the colors will not disappear or smudge when you work with them.

One picture is going to be the background of your picture.


 Now you will have to take a good look at the picture and decide which parts you would like to stand out more. In this picture you will notice that Saint Nick and his helper  are  in  front of the  shop as  well as  the kids on the right. They are the parts we want to stand out more.

  So cut out the Saint Nic  part of the picture like I did , shown at the top left. Then cut out the same part of the picture like the one  at the top on the right. You will notice the background and the pavement have now gone.  The part with the kids gets the same treatment. First you cut out the Shop window and
all the kids in one piece. From the next picture you only cut out the boy in the yellow coat. You will see those pics on the right.

Now you will need some double sided foam tape. Cut some very small pieces of foam tape and glue them to the backs of the  cut outs.

Remove the backing paper and first stick the ones that have the background on them to the picture at the matching spot in the background picture.  Make sure there is no foam showing ! Then glue the second set of cut outs ( those with no background) on top of the ones you did before.
You will be amazed by  the amount of depth this adds to your picture.

If you want to add extra effect you can varnish the whole picture or paint it with Mod Podge Dimensional magic.

Of Course you can use any picture you like to try this treatment  and create a 3D picture in miniature.

The chocolate letters ( you get your initial as a gift) are made using alphabet pasta and brown paint. The chocolate Saint Nic figures were made in the  3 D technique using  2 photos  of the real thing sandwiched together with foam tape.

The wrapping paper I found on the internet.


Friday, November 21, 2014

My Furry Friends

Over the years I have made tons  of little furry friends.  They have found homes allover the world and some are still living with me.


They are made in my special technique. I start with a chenille stem frame and then I add the rest of the fur by hand to create  their shapes, faces and expressions.

I love finding little things for the bears to play with and I do knit and crochet for them when they feel like wearing something.
Every bear is unique and I like picking names for them . I never know what a bear will want to be when the basic bear has been made. I may think I am making something but very soon the bear takes over and I am often suprised  by how they turn out.


My little bears have been like little friends  over the years. They made me laugh and they sometimes frustrated me.  But they have always been great company.


So today I want to share some pics of my dear little friends


Have not made bears for a while now, but perhaps I should try again...........


Or mice , right Miyaa ?


Saturday, November 15, 2014

Christmas scene in a mason jar

It seemed like a brilliant idea when I started this project : a little christmas scene in a mason jar. I must say the project itself worked out quite well and it is really cute. The not brilliant part turned out to be that is almost impossible to get a good photo of the scene inside the jar.


Am sharing it anyway because  I think it is a fun project to make and to use to decorate your house with and as long as you do not want fantastic photos of it, you will be happy with it.

Mine will be a gift to a lady who does live in a senior appartment  and who does not have much room for things like a christmas tree.  I think she will like it.


Look for a nice picture that is tall enough to fit inside the mason yar. The width does not really matter . I did not want a really big one because I wanted to create a sort small window at the front of the yar where you can see the picture.


I used Mod Podge to stick the picture to the inside of the jar. Painted the bottom of the jar with snow paint.

Used a sponge to create a paint effect on the outside with gesso  which sticks to the glass really well.
I needed two coats and I added a little bit of fine glitter to the last coat.

A lampost , a mini tree and a snow man add some extra depth and interest to the little scene.

BTW the picture is by Anthn Pieck who did such lovely winter scenes.


I added a little led light with battery on top of the lid. Drilled a hole in the lid so the light would shine inside and light up the shop window.


I hated the sight of the light on top so I added a lid from a tin to hide the light. You can lift it up to swtich on the light or change the battery.


 Day time shot of the mason jar without the light on.


See how hard it is to take a clear picture of something insdie a jar ?


Update :

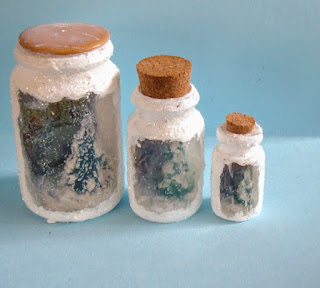
Just for fun I made three other versions using the same technique  but small, smaller and really tiny bottles.
I used a smaller print of the picture, a smaller tree but the rest  was done in the exact same way as the big one.


You will notice that it is even harder to take pics of the smaller ones but they like very cute.

This is the biggest one of the three. 

Sunday, November 9, 2014

My stitched gingerbread house in AM


Even though gingerbread houses are not a tradition in the Netherlands, I have always admired them in books and magazines and I often longed to be able to make one.
A few years back I tried making one out of crackers following a recipe from a magazine. They said it was easy but I found it very hard and ended up with a pile of broken crackers.

A friend then sent me a recipe for one made out of polymer clay which was supposed to be even easier. I am no good with clay but decided to give it a try anyway. I could not produce anything that looked like a house,  let alone a decorated house. So I gave up on the idea.

But then I discovered plastic canvas and I did have a lot of fun making "gingerbread houses" out of that. . Of course I wanted one for my dolls house too. The normal plastic canvas is not  suitable for a mini version  but a friend gave me some 14 count plastic canvas  and that was just perfect. So I now have several gingerbread houses in different scales.

I am sharing the pattern for the mini one with you today. Here is the list of stuff you will need to make one :
14 count plastic canvas  ( 1 sheet is plenty)
Thin wool or embroidery floss in light brown, pink, yellow, and white.
Needles to match your wool or floss.
Narrow braid in white and pink
Stick on pearls
Tiny flowers. Mine are from a fimo cane but you can also use beads.
Flower foam  ( finely shredded foam used to suggest flowers)
Bead in the shape of a Christmas tree
Ultra fine glitter
Miniature candy canes
Tacky glue
A small zip lock  bag to keep your pieces of plastic canvas safe.
A wooden disc to stand your house on
Snow paint like Aleene's true snow or caulking.


The canvas I used.


Step 1.  Cutting the plastic canvas.  The front and the back of the house are the same size. There are two side panels that are also the same sizes.  And there are also two parts for the roof.
Shape for the front and back starting from the bottom : 8 stitches  wide and 6 even rows high. The next 4 rows are decreasing one hole at each end to get the slope for the roof.
Sides of the house : Each panel is 8  stitches  wide and 6 rows high
Roof panels : 8 holes wide  and 6 rows high.

Embroidering the house:
 Now we will do the embroidery. I like to use thin wool because it covers the canvas nicely. Some people like to work with a double thread  but  I prefer working with a single thread and working each row twice : once from right to left and once from left to right. I have used tent stitch.


Front panel :
The door is stitched in pink : 2 stitches wide and 3 stitches high.  Check with the chart  for placement . The rest of the panel is done in brown.

Back panel. Start with the window in yellow. Two stitches by 2 stitches. Check with the chart for placement. The rest of the panel is worked in brown
.
Side panels ( two the same) Start with the window  2 stitches wide and 2 stitches high in yellow . Check with the chart for placement . The rest of the panel is worked in brown.

Roof panels ( two the same) . Start with a row of white stitches around each panel. Then fill in the centre in brown.  I did also work a row of stitches around the sides of the panels to cover the canvas showing there. There is no need to do this for the other panels for their sides will be covered when the house is either sewn together or glued to the stand.

Building the house. 
Use white wool or floss to sew the house together.  Sew back and front to side panels , working each joining twice so the canvas is well covered.

The roof panels are joined together along one long side . This will be the top of the roof.  I glued the roof to the top of the house using tacky glue.  Then ,  I glued the house on the wooden disk that I wanted to use as a stand. I did this slightly off centre to allow a little room at the front of the house.


Decorating the house :
I used some white braid with little loops to cover the sides of the front and back of the house. This is glued in place with tacky glue. The loops will look like little icicles which looks really pretty.

Around the doors and windows I glued pink braid to suggest door and window frames.  The braid at the bottom of the windows got decorated with a little bit of flower foam to suggest window boxes with flowers, but that is optional.

At each corner of the house I glued down a miniature candy cane  and then I added tiny flowers and stick on beads to the roof to suggest sweets. I also added a flower over the front door.

I painted the wooden disk around the house with a thick coat of snow paint. ( if you can't find snow paint,  try  caulking, or spackle with a little glitter added to it.

I pressed the tree shaped bead into the wet snow . When the snow had dried the tree was firmly stuck into place. I decorated the tree with some ultra fine glitter.

Here it is all ready for Christmas 


 T


Saturday, November 1, 2014

The story inside the book, final chapter


 Today we are going to make some more items to stock up the shop with.


Have you ever notice how much erasers look like soap ?? Check the pictures below to find out how easy it is to make erasor soaps.


Adding a nice label and wrapping them in a piece of tissue paper or ribbon adds a really nice touch,
You can cut any shape you like from  your erasors


On the shelves there are several different kinds of erasor soaps. They are also perfect to use when you want to make mini soap chains. They are bascially soap on a rope with some embellishments added. A lot of fun to make both in full scale and in miniature.


Beads of course make perfect bottles in all shapes size and colors. I love adding tiny stick on rhine stones for bottle caps.


But do not despair if you do not have any beads around. Just get out the erasors and your knife again and you will find that you can make very lovely and easy bottles with those as well .


Here you go pretty bottles and soaps , all made ouf of erasors.

It is lovely to create  a set of toilettries in matching colors. This lavender set was made out of erasors and different kinds of beads.


Showing them on the shelves . The green set was made from a kit sold by www.minikitz.com the others are all my erasors and bead creations.

Hope this will inspire you.


Tuesday, October 28, 2014

The story inside the book, part 3


 Today we are  making something that can be sold in  " au bonheur des dames " Bath salts used to be a much appreciated gift in my family so I wanted to try and make some of those.  I had some pretty big bottles and I felt they were just right for storing bath salts that would be sold in smaller containers later.


Bath salt is very easy to make in miniature . It all starts with some sea salt or rock salt.  Just a little makes a whole lot of bath salt. It will be a good idea not to use the bigger pieces for they will look very  big in 12 th scale .


Then ofcourse you want your salt to have a pretty color.   For me this very easy method works very well .


Put the salt in a small container and grate a little bit of chalk or oil pastel over the salt.  I just used my exacto knife to do this.


Just give them whole thing a real  good stir  using a dry brush till your salt is  a nice color. You can add more color if you want to by adding some more chalk or pastel .


Here are some of the bath salts I made. They look pretty in glass bottles . Using one colour is nice but layering different colours looks smashing too. Add a nice label if you like and you are done.